Writing Data to a Kafka Topic in Java Spring Boot Example
In this example, we will be building a sample Kafka Producer application in Java Spring Boot to send data to a Kafka topic through a REST API.
An application used to send data to one or more topics in Kafka clusters is referred to as a Producer application.
Here are the steps, starting from scratch, to create a Kafka producer in Spring Boot for sending data to a Kafka topic:
Create a Spring Boot Application
- Go to the Spring Initializr website at https://start.spring.io.
- Create a Spring Boot application with details as follows:
- Project: Choose the project type (Maven or Gradle).
- Language: Set the language to Java.
- Spring Boot: Specify the Spring Boot version. The default selection is the latest stable version of Spring Boot, so you can leave it unchanged.
- Project Metadata: Enter a Group and Artifact name for your project. The group name is the id of the project. Artifact is the name of your project. Add any necessary project metadata (description, package name, etc.)
- Choose between packaging as a JAR (Java Archive) or a WAR (Web Application Archive) depends on how you plan to deploy your Spring Boot application. Choose JAR packaging if you want a standalone executable JAR file and WAR packaging if you intend to deploy your application to a Java EE application server or servlet container. When you package your Spring Boot application as a JAR using JAR packaging, it includes an embedded web server, such as Tomcat, by default. This means that you don't need to separately deploy your application to an external Tomcat server. Instead, you can run the JAR file directly, and the embedded Tomcat server will start and serve your application.
- Select the Java version based on the compatibility requirements of your project. Consider the specific needs of your project, any compatibility requirements, and the Java version supported by your target deployment environment when making these choices.
- Click on the Add Dependencies button.
- Choose the following dependencies: Spring Web, Spring for Apache Kafka (Messaging) , Lombok, and Spring Boot DevTools.
- Generate the project:
- Click on the Generate button.
- Spring Initializr will generate a zip file containing your Spring Boot project.
- Download and extract the generated project:
- Download the zip file generated by Spring Initializr.
- Extract the contents of the zip file to a directory on your local machine.
- Import the project into your IDE:
- Open your preferred IDE (IntelliJ IDEA, Eclipse, or Spring Tool Suite).
- Import the extracted project as a Maven or Gradle project, depending on the build system you chose in Spring Initializr.
Refer to this image for example:

Add Configurations
Open the src/main/resources/application.properties file in your code editor and add the following configuration lines to the file:
server.port = 8080

kafka.server_endpoint = 127.0.0.1:9092
kafka.topic_name = my-topic-name
Here, server.port=8080 configuration line is used to specify the port number on which the server will listen for incoming requests. In this case, it sets the server port to 8080.
kafka.server_endpoint = 127.0.0.1:9092: This specifies the endpoint or address of the Apache Kafka broker that the Spring Boot application will communicate with. Apache Kafka is designed as a distributed system, and the broker is a central component that manages the messaging between producers and consumers. In this case, the Kafka broker is located at the IP address 127.0.0.1 (which is the loopback address, referring to the local machine) and is listening on port 9092.
kafka.topic_name = my-topic-name: This sets the name of the Kafka topic to which the Spring Boot application will produce messages. In Kafka, a topic is a logical channel or category to which messages are published. In this case, the application is set to produce messages to a topic named my-topic-name.
Create a DTO class
Create a MessageRequestDto class as a Data Transfer Object (DTO) to represent the request payload for creating a message:
package com.example.kafka.producer.dto;

import lombok.AllArgsConstructor;
import lombok.Data;
import lombok.NoArgsConstructor;

@Data
@AllArgsConstructor
@NoArgsConstructor
public class MessageRequestDto {
  private String vehicleId;
  private String longitude;
  private String latitude;
  private String driverId;
  private double speed;
}
Create Kafka Producer Configuration Class
Create a Java class named KafkaProducerConfig and annotate it with the @Configuration annotation. This configuration class should include methods for establishing a connection between the Kafka Producer application and the Kafka Server:
package com.example.kafka.producer.config;

import java.util.HashMap;
import java.util.Map;
import org.apache.kafka.clients.producer.ProducerConfig;
import org.apache.kafka.common.serialization.StringSerializer;
import org.springframework.beans.factory.annotation.Value;
import org.springframework.context.annotation.Bean;
import org.springframework.context.annotation.Configuration;
import org.springframework.kafka.core.DefaultKafkaProducerFactory;
import org.springframework.kafka.core.KafkaTemplate;
import org.springframework.kafka.core.ProducerFactory;
import com.example.kafka.producer.dto.MessageRequestDto;
import org.springframework.kafka.support.serializer.JsonSerializer;


@Configuration
public class KafkaProducerConfig {

  @Value(value = "${kafka.server_endpoint}")
  private String kafkaServerEndpoint;

  @Bean
  public ProducerFactory<String, MessageRequestDto> producerFactory() {
    Map<String, Object> configProps = new HashMap<>();
    configProps.put(ProducerConfig.BOOTSTRAP_SERVERS_CONFIG, kafkaServerEndpoint);
    configProps.put(ProducerConfig.KEY_SERIALIZER_CLASS_CONFIG, StringSerializer.class);
    configProps.put(ProducerConfig.VALUE_SERIALIZER_CLASS_CONFIG, JsonSerializer.class);
    return new DefaultKafkaProducerFactory<>(configProps);
  }

  @Bean
  public KafkaTemplate<String, MessageRequestDto> kafkaTemplate() {
    return new KafkaTemplate<>(producerFactory());
  }

}
Create a service interface
Create a service interface that defines the contract for the producer. Create a new interface called KafkaProducerService:
package com.example.kafka.producer.service;

import com.example.kafka.producer.dto.MessageRequestDto;

public interface KafkaProducerService {

  void sendMessage(MessageRequestDto messageRequest);

}
Create a service implementation class
Create an implementation class that implements the KafkaProducerService interface and handles the business logic. Let's create a class called KafkaProducerServiceImpl:
package com.example.kafka.producer.service.impl;

import java.util.concurrent.CompletableFuture;
import org.slf4j.Logger;
import org.slf4j.LoggerFactory;
import org.springframework.beans.factory.annotation.Autowired;
import org.springframework.beans.factory.annotation.Value;
import org.springframework.kafka.core.KafkaTemplate;
import org.springframework.kafka.support.SendResult;
import org.springframework.stereotype.Service;
import com.example.kafka.producer.dto.MessageRequestDto;
import com.example.kafka.producer.service.KafkaProducerService;

@Service
public class KafkaProducerServiceImpl implements KafkaProducerService {

  private static final Logger LOGGER = LoggerFactory.getLogger(KafkaProducerServiceImpl.class);

  @Autowired
  private KafkaTemplate<String, MessageRequestDto> kafkaTemplate;

  @Value(value = "${kafka.topic_name}")
  private String kafkaTopicName;

  @Override
  public void sendMessage(MessageRequestDto messageRequest) {

    CompletableFuture<SendResult<String, MessageRequestDto>> future =
        kafkaTemplate.send(kafkaTopicName, messageRequest);

    future.whenComplete((result, exception) -> {
      if (exception != null) {
        future.completeExceptionally(exception);
        LOGGER.info("Error while sending data to Kafka topic : {}",kafkaTopicName);
      } else {
        future.complete(result);
        LOGGER.info("Successfully sent message : {}, with offset : {}", messageRequest,
            result.getRecordMetadata().offset());
      }
    });
  }

}
Create a Web Controller
Create a controller class named KafkaProducerController that will handle HTTP requests and interact with the KafkaProducerService:
package com.example.kafka.producer.controller;

import org.springframework.beans.factory.annotation.Autowired;
import org.springframework.web.bind.annotation.PostMapping;
import org.springframework.web.bind.annotation.RequestBody;
import org.springframework.web.bind.annotation.RequestMapping;
import org.springframework.web.bind.annotation.RestController;
import com.example.kafka.producer.dto.MessageRequestDto;
import com.example.kafka.producer.service.KafkaProducerService;

@RestController
@RequestMapping(path = "/producer")
public class KafkaProducerController {

  @Autowired
  private KafkaProducerService kafkaProducerService;

  @PostMapping(path = "/messages")
  public void sendMessage(@RequestBody MessageRequestDto messageRequest) {
    kafkaProducerService.sendMessage(messageRequest);
  }

}
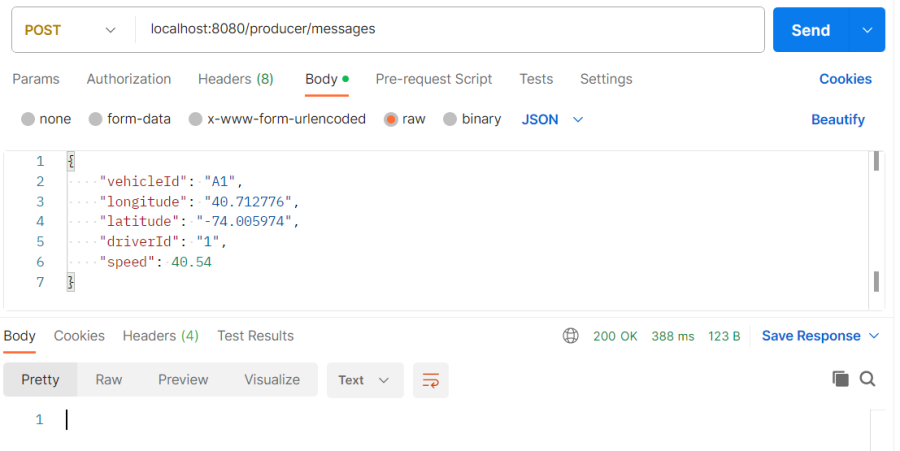
Build and run your Spring Boot application
Test your endpoints by using API testing tools such as Postman: