Install Eclipse IDE on Ubuntu
If you are a developer using Ubuntu for your programming projects, you'll likely want to have a powerful integrated development environment (IDE) to make your work more efficient. Eclipse is a widely-used, open-source IDE that offers robust features for various programming languages. In this tutorial, we'll walk you through the process of installing Eclipse IDE on Ubuntu, making your development journey even smoother.
Prerequisites
Before we get started, make sure you have:
- Java 8+ installed.
- A user account with sudo privileges.
Follow the steps below to install the Eclipse IDE on an Ubuntu system:
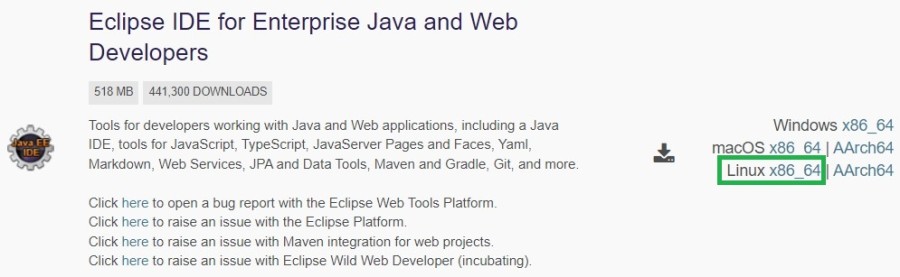
- Visit the official Eclipse download page and locate "Eclipse IDE for Enterprise Java and Web Developers":
- Click on "Linux x86_64". You will be redirected to the download page. Click on the download link.
- Next, open a terminal and navigate to the directory where you downloaded the file. In this example, I placed the file in the Downloads directory:
- Next, extract the downloaded tar.gz file using the command provided in the example below:
- Next, move the extracted Eclipse folder to the /opt location using this command:
- Next, launch an empty file using this command in the terminal:
- Copy and paste the following into the empty file:
- Next, save the file and run the following command in the terminal. This will automatically install the desktop file on your Ubuntu/Linux system:
- Navigate to /usr/local/bin and create a symlink to /usr/bin by executing the following two commands:
cd Downloads
tar -xzvf eclipse-jee-2023-09-R-linux-gtk-x86_64.tar.gz
sudo mv eclipse /opt
sudo gedit /usr/share/applications/eclipse.desktop
[Desktop Entry]
Name=Eclipse
Type=Application
Exec=/opt/eclipse/eclipse
Terminal=false
Icon=/opt/eclipse/icon.xpm
Comment=Integrated Development Environment
NoDisplay=false
Categories=Development;IDE;
Name[en]=eclipse.desktop
sudo desktop-file-install /usr/share/applications/eclipse.desktop
cd /usr/local/bin
sudo ln -s /opt/eclipse/eclipse
After installation, you can launch Eclipse IDE from the Applications menu by searching with the keyword "Eclipse". When you open it for the first time, it will prompt you to specify a workspace. Once that is done, the main page will load.