Spring Boot
Building Microservices using Spring Boot in 2024
- Last updated Apr 25, 2024
In this tutorial, we will show you a complete example of how you can create, run, and test microservices using Spring Boot.
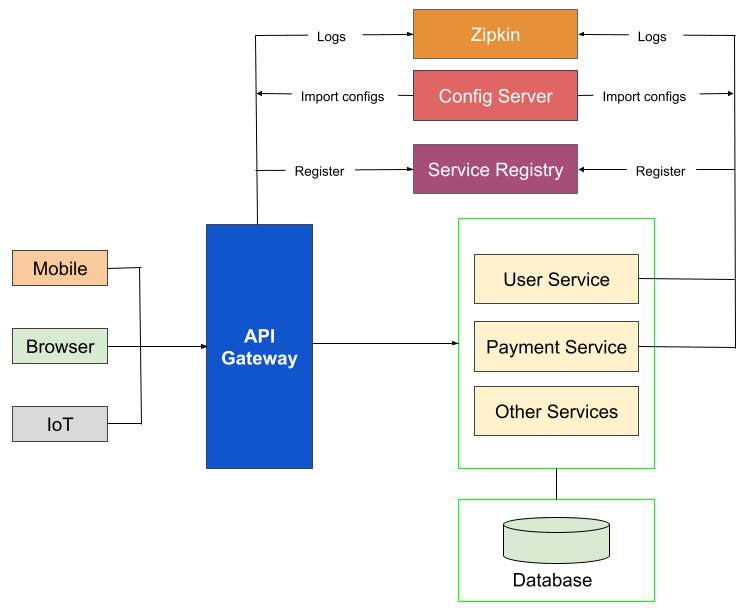
Microservices is a collection of small, independent services that can communicate with each other through well-defined APIs. Each service is responsible for handling specific business operations. Microservices are loosely coupled, meaning they operate independently without depending on other services. This makes deployment, maintenance, updates, and scaling of each service easier. Microservices architecture was designed to address challenges associated with traditional monolithic architectures where all components (user interface, business logic, and data access) are tightly integrated into a single codebase and run as a single process.
Here's the microservices architecture diagram that we will be building in this example:
Follow these steps to complete this example:
Create Service Registry
A service registry helps manage and discover services within the system. It acts as a centralized directory where services register their location and metadata such as the service name, host, port, etc. It enables dynamic service discovery, allowing microservices to find and communicate with each other in a scalable and distributed environment. Spring Cloud, a set of tools and libraries provided by the Spring framework, includes a service registry called Eureka, which is specifically designed for service registration and discovery in a microservices architecture.
Create a Spring Boot project to use it as a service registry with these steps:
- Go to Spring Initializr website at https://start.spring.io.
- Choose the project type (Maven or Gradle).
- Set the language to Java.
- Specify the Spring Boot version (recommended to use the default selected version).
- Enter the group name for your project. The group name serves as the project's identifier. It is typically the domain name in reverse form (for example: com.yourdomain).
- Enter your project name in the Artifact field. The artifact name represents the name of your project.
- Add any necessary project metadata (description, package name, etc.).
- Set the packaging to JAR.
- Select the Java version based on the compatibility requirements of your project. Consider the specific needs of your project, any compatibility requirements, and the Java version supported by your target deployment environment when making these choices.
- Add Eureka Server and Spring Web as dependencies.
- Click the Generate button to download the Spring Boot project as a zip file.
- Extract the contents of the zip file to a directory on your local machine.
- Import the extracted project as a Maven or Gradle project into your preferred IDE, depending on the build system you chose in Spring Initializr.
- Annotate the main Application class of your Spring Boot application with the @EnableEurekaServer annotation:
- Rename the /resources/application.properties file to /resources/application.yaml, and add the configurations for the Eureka Server by specifying properties as shown below:
- Run your Eureka Server application.
- After the server is running, you can access the Eureka Server dashboard by visiting to http://localhost:8761 in your web browser. This dashboard provides details about registered services and their instances.
Refer to this image for example:

package com.tutorialsbuddy.serviceregistry;

import org.springframework.boot.SpringApplication;
import org.springframework.boot.autoconfigure.SpringBootApplication;
import org.springframework.cloud.netflix.eureka.server.EnableEurekaServer;

@SpringBootApplication
@EnableEurekaServer
public class ServiceRegistryApplication {

   public static void main(String[] args) {
      SpringApplication.run(ServiceRegistryApplication.class, args);
   }

}
# Configure the server port (default is 8761)
server:
  port: 8761

# Set the application name
spring:
  application:
    name: registry-service

# Enable Eureka Server
eureka:
  instance:
    hostname: localhost
  client:
    registerWithEureka: false # Disable registration of this application with Eureka
    fetchRegistry: false # Disable fetching the registry information from Eureka
    serviceUrl:
      defaultZone: http://${eureka.instance.hostname}:${server.port}/eureka/
Create Config Server
Create a new Spring Boot project to use it as a config server. A config server acts as a centralized directory for storing configurations for all microservices. It helps manage and distribute configuration properties to microservices dynamically at runtime. A restart of the microservices is not required after changing the properties in the configuration files. Before running the microservices, we should make sure that the Config Server is in a running state, as the microservices import configuration from it.
Follow these steps to create the config server:
- Using the Spring Initializr (https://start.spring.io), create a new Spring Boot project.
- Choose the project type (Maven or Gradle).
- Set the language to Java.
- Specify the Spring Boot version (recommended to use the latest stable version, which is selected by default).
- Enter the group name for your project (for example: com.yourdomain).
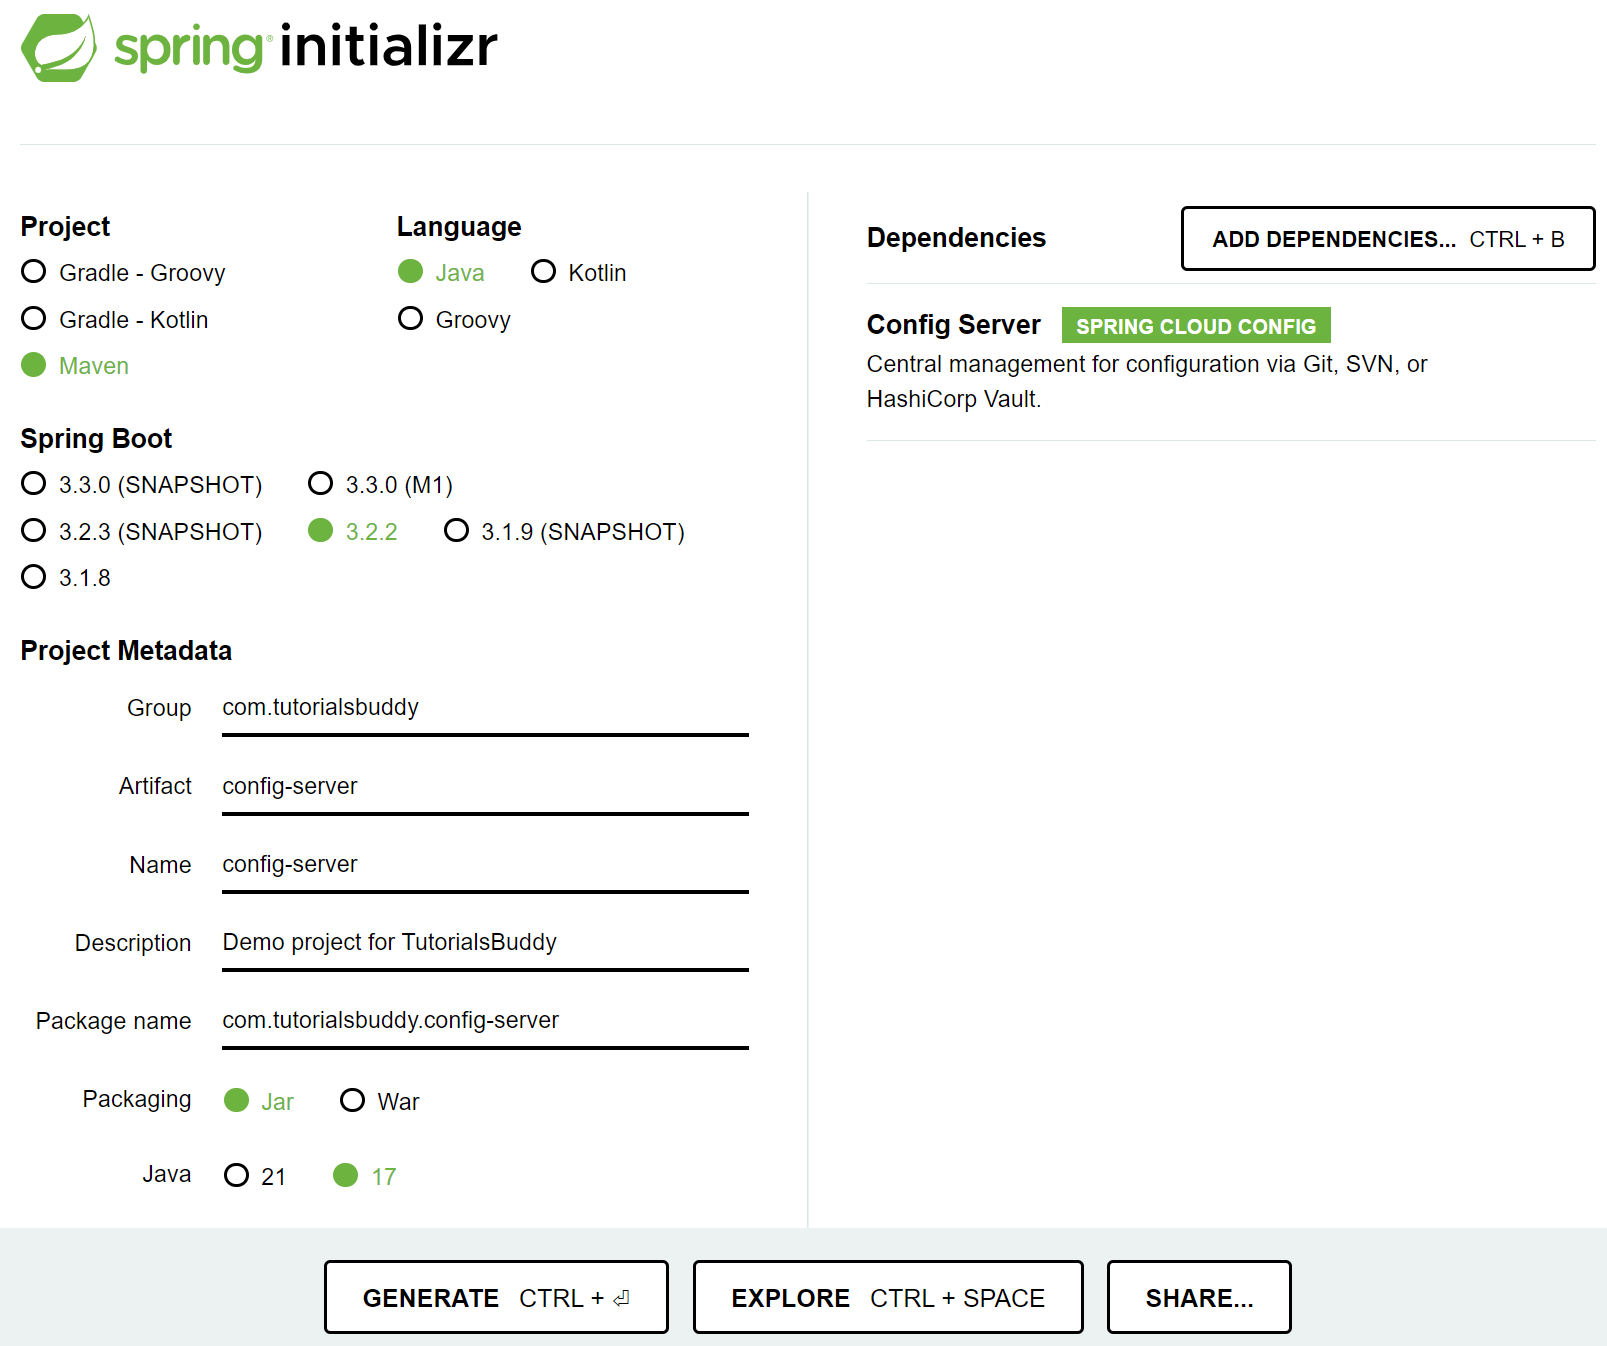
- Enter your project name (config-server) in the Artifact field.
- Add any necessary project metadata (description, package name, etc.).
- Set the packaging to JAR.
- Select the Java version based on the compatibility requirements of your project.
- Add Config Server (SPRING CLOUD CONFIG) as dependency.
- Click the Generate button to download the Spring Boot project as a zip file.
- Extract the contents of the zip file to a directory on your local machine.
- Import the extracted project as a Maven or Gradle project into your preferred IDE, depending on the build system you chose in Spring Initializr.
- In your main Spring Boot application class, add the @EnableConfigServer annotation to enable the Configuration Server:
- Rename the /resources/application.properties file to /resources/application.yaml, and configure the Config Server by specifying properties as shown below:
- Within the src/main/resources directory of your Config Server application, create a new folder named config. This config folder serves as the repository for configuration files for microservices. It's important to ensure that the file names correspond to the respective service application names. Thus, create user-service.yaml, payment-service.yaml, and api-gateway.yaml files within this config directory. These files will contain the configurations specific to each microservice. As we build the user-service, payment-service, and api-gateway applications, they will dynamically fetch their respective configuration files from the Config Server during runtime.
Refer to the image below for example:
package com.tutorialsbuddy.configserver;

import org.springframework.boot.SpringApplication;
import org.springframework.boot.autoconfigure.SpringBootApplication;
import org.springframework.cloud.config.server.EnableConfigServer;

@SpringBootApplication
@EnableConfigServer
public class ConfigServerApplication {

   public static void main(String[] args) {
      SpringApplication.run(ConfigServerApplication.class, args);
   }

}
server:
  port: 8888

# Set the application name
spring:
  application:
    name: config-server
  profiles:
    active: native # Lookup to load the config files from the local classpath and not from GIT
server:
  port: 8082

# Eureka Client Configuration
eureka:
  instance:
    hostname: localhost
    preferIpAddress: true
  client:
    serviceUrl:
      defaultZone: http://localhost:8761/eureka/

# MySQL Configuration
spring:
  datasource:
    url: jdbc:mysql://localhost:3306/user_db
    username: root
    password: Testing123$
    timeBetweenEvictionRunsMillis: 60000
    maxIdle: 1
    driverClassName: com.mysql.cj.jdbc.Driver

# Below properties will automatically create and update database schema
  jpa:
    generate-ddl: true
    hibernate:
      ddl-auto: update

# Sleuth configuration 100% of traces
management:
  tracing:
    sampling:
      probability: 1.0
server:
  port: 8081

# Eureka Client Configuration
eureka:
  instance:
    hostname: localhost
    preferIpAddress: true
  client:
    serviceUrl:
      defaultZone: http://localhost:8761/eureka/

# MySQL Configuration
spring:
  datasource:
    url: jdbc:mysql://localhost:3306/payment_db
    username: root
    password: Testing123$
    timeBetweenEvictionRunsMillis: 60000
    maxIdle: 1
    driver-class-name: com.mysql.cj.jdbc.Driver

# Below properties will automatically create and update database schema
  jpa:
    generate-ddl: true
    hibernate:
      ddl-auto: update

# Sleuth configuration 100% of traces
management:
  tracing:
    sampling:
      probability: 1.0
server:
  port: 8060

eureka:
  instance:
    hostname: localhost
    preferIpAddress: true
  client:
    serviceUrl:
      defaultZone: http://localhost:8761/eureka/

spring:
  cloud:
    gateway:
      routes:
        - id: user-service
          uri: lb://user-service
          predicates:
            - Path=/users/**
        - id: payment-service
          uri: lb://payment-service
          predicates:
            - Path=/payments/**

management:
  endpoints:
    web:
      exposure:
        include: '*'
  tracing:
    sampling:
      probability: 1.0
Create User Service
Create a new Spring Boot project to use it as a microservice that implements business logic and expose REST APIs for user service.
Using the Spring Initializr (https://start.spring.io), create a new Spring Boot project with the following details:
- Choose the project type (Maven or Gradle).
- Set the language to Java.
- Specify the Spring Boot version (recommended to use the latest stable version, which is selected by default).
- Enter the group name for your project (for example: com.yourdomain).
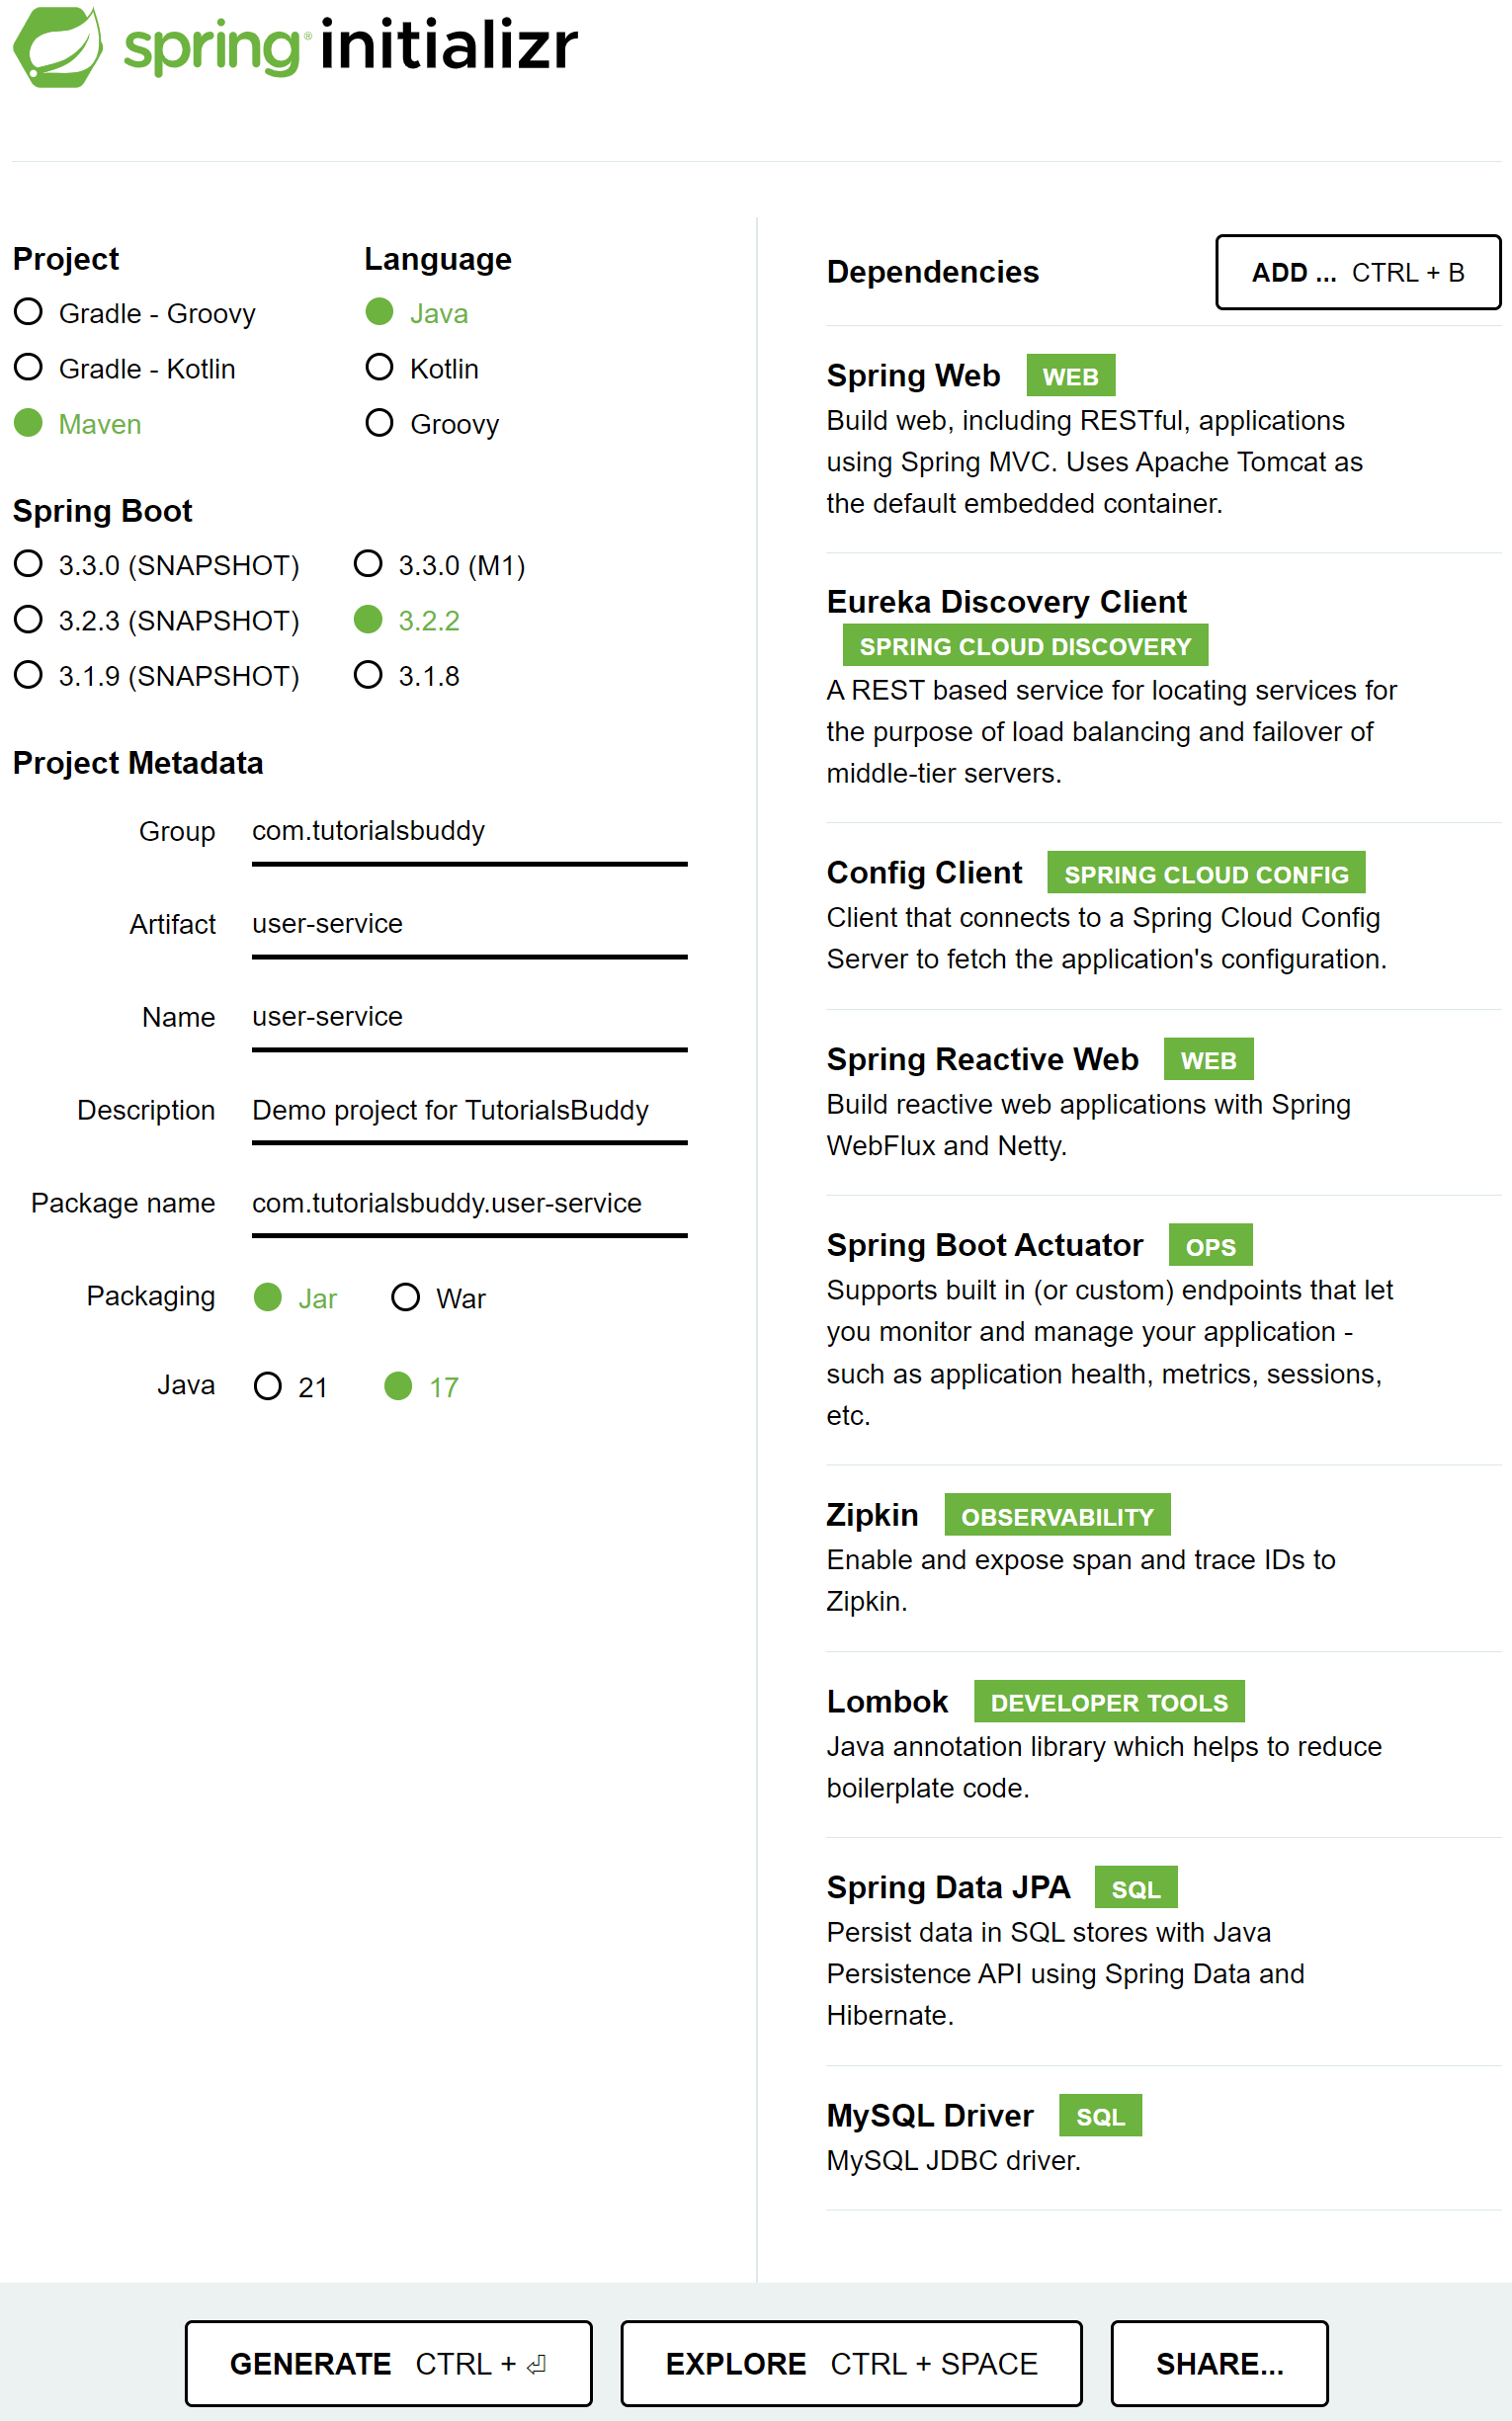
- Enter your project name (user-service) in the Artifact Name field.
- Add any necessary project metadata (description, package name, etc.).
- Set packaging to JAR.
- Select the Java version based on the compatibility requirements of your project.
- Add necessary dependencies, such as Spring Web, Eureka Discovery Client (SPRING CLOUD DISCOVERY), Config Client (SPRING CLOUD CONFIG), Spring Reactive Web, Spring Boot Actuator, and Zipkin as dependencies. This microservice will perform CRUD operations, so let's include Lombok, Spring Data JPA, and the MySQL Driver. You can also add other dependencies as required by your project.
- Click the Generate button to download the Spring Boot project as a zip file.
- Extract the contents of the zip file to a directory on your local machine.
- Import the extracted project as a Maven or Gradle project into your preferred IDE, depending on the build system you chose in Spring Initializr.
- In your main Spring Boot application class, add the @EnableDiscoveryClient annotation to enable the service discovery capabilities. The @EnableDiscoveryClient annotation indicates that the application should register itself with the service registry and participate in the service discovery process. This enables other services in the network to locate and communicate with the annotated application without hardcoding specific hostnames or IP addresses:
- Rename the /resources/application.properties file to /resources/application.yaml, and configure the Eureka Server by specifying properties as shown below:
- Create a public enum, UserStatus with the values PENDING, APPROVED, and REJECTED to represent the status of users:
- Create an entity class to represent the user table in the database. The entity class is typically annotated with @Entity to indicate that it is a JPA entity:
- Create a repository interface to perform CRUD operations on the user entity:
- Create DTO classes to represent data for API requests and responses:
- Create UserService interface to define the methods for managing user-related operations:
- Create a UserServiceImpl class to provide the concrete implementation for the user-related functionalities specified in the UserService interface:
- Create a PaymentClient interface to define the methods for interacting with payment-related endpoints from the payment-service:
- Create of a configuration class (WebClientConfig) with the necessary annotations and methods for configuring a WebClient and a PaymentClient:
- Create a UserController class to handle HTTP requests and manage the interaction with the application services related to user operations:
Here's an example:
package com.tutorialsbuddy.userservice;

import org.springframework.boot.SpringApplication;
import org.springframework.boot.autoconfigure.SpringBootApplication;
import org.springframework.cloud.client.discovery.EnableDiscoveryClient;
import org.springframework.data.jpa.repository.config.EnableJpaAuditing;

@SpringBootApplication
@EnableDiscoveryClient
@EnableJpaAuditing
public class UserServiceApplication {

  public static void main(String[] args) {
    SpringApplication.run(UserServiceApplication.class, args);
  }

}
spring:
  application:
    name: user-service

# Import configurations from the config-server
  config:
    import: optional:configserver:http://localhost:8888
package com.tutorialsbuddy.userservice.constants;

public enum UserStatus {
PENDING,
APPROVED,
REJECTED
}
package com.tutorialsbuddy.userservice.entity;

import java.util.Date;
import org.springframework.data.annotation.CreatedBy;
import org.springframework.data.annotation.CreatedDate;
import org.springframework.data.annotation.LastModifiedBy;
import org.springframework.data.annotation.LastModifiedDate;
import org.springframework.data.jpa.domain.support.AuditingEntityListener;
import com.tutorialsbuddy.userservice.constants.UserStatus;
import jakarta.persistence.Entity;
import jakarta.persistence.EntityListeners;
import jakarta.persistence.GeneratedValue;
import jakarta.persistence.GenerationType;
import jakarta.persistence.Id;
import jakarta.persistence.Table;
import lombok.AllArgsConstructor;
import lombok.Builder;
import lombok.Builder.Default;
import lombok.Data;
import lombok.NoArgsConstructor;

@Data
@Builder
@AllArgsConstructor
@NoArgsConstructor
@EntityListeners(AuditingEntityListener.class)
@Entity
@Table(name = "user")
public class User {

  @Id
  @GeneratedValue(strategy = GenerationType.IDENTITY)
  private Long id;
  private String firstName;
  private String lastName;
  private String dateOfBirth;
  private String email;
  @Default
  private boolean deleted = false;
  @Default
  private UserStatus status = UserStatus.PENDING;

  @CreatedDate
  private Date createdDate;
  @LastModifiedDate
  private Date modifiedDate;

  @CreatedBy
  private String createdBy;
  @LastModifiedBy
  private String modifiedBy;

}
package com.tutorialsbuddy.userservice.repository;

import org.springframework.data.repository.CrudRepository;
import org.springframework.stereotype.Repository;
import com.tutorialsbuddy.userservice.entity.User;

@Repository
public interface UserRepository extends CrudRepository<User, Long> {

}
package com.tutorialsbuddy.userservice.dto;

import lombok.Builder;
import lombok.Data;

@Data
@Builder
public class ApiRequest {

}
package com.tutorialsbuddy.userservice.dto;

import lombok.AllArgsConstructor;
import lombok.Builder;
import lombok.Data;
import lombok.NoArgsConstructor;

@Data
@Builder
@AllArgsConstructor
@NoArgsConstructor
public class ApiResponse {
  private boolean success;
  private String message;
  private int errorCode;
  private Object data;

}
package com.tutorialsbuddy.userservice.dto;

import lombok.Data;
import lombok.EqualsAndHashCode;
import lombok.ToString;

@Data
@EqualsAndHashCode(callSuper = false)
@ToString
public class UserRequest extends ApiRequest {
  private Long id;
  private String firstName;
  private String lastName;
  private String dateOfBirth;
  private String email;
}
package com.tutorialsbuddy.userservice.dto;

import java.util.Date;
import com.fasterxml.jackson.annotation.JsonInclude;
import com.tutorialsbuddy.userservice.constants.UserStatus;
import lombok.Builder;
import lombok.Data;

@Data
@Builder
@JsonInclude(JsonInclude.Include.NON_NULL)
public class UserResponse {
  private Long id;
  private String firstName;
  private String lastName;
  private String dateOfBirth;
  private String email;
  private UserStatus status;
  private Date createdDate;
  private Date modifiedDate;
  private String createdBy;
  private String modifiedBy;
  private Object payments;
}
package com.tutorialsbuddy.userservice.service;

import com.tutorialsbuddy.userservice.dto.ApiResponse;
import com.tutorialsbuddy.userservice.dto.UserRequest;
import jakarta.servlet.http.HttpServletRequest;

public interface UserService {

  ApiResponse addUser(UserRequest userRequest, HttpServletRequest httpRequest);

  ApiResponse getUserPayments(Long userId, HttpServletRequest httpRequest);

}
package com.tutorialsbuddy.userservice.service.impl;

import java.util.Optional;
import org.slf4j.Logger;
import org.slf4j.LoggerFactory;
import org.springframework.beans.factory.annotation.Autowired;
import org.springframework.stereotype.Service;
import com.tutorialsbuddy.userservice.client.PaymentClient;
import com.tutorialsbuddy.userservice.dto.ApiResponse;
import com.tutorialsbuddy.userservice.dto.UserRequest;
import com.tutorialsbuddy.userservice.dto.UserResponse;
import com.tutorialsbuddy.userservice.entity.User;
import com.tutorialsbuddy.userservice.repository.UserRepository;
import com.tutorialsbuddy.userservice.service.UserService;
import jakarta.servlet.http.HttpServletRequest;

@Service
public class UserServiceImpl implements UserService {
  private static final Logger LOGGER = LoggerFactory.getLogger(UserServiceImpl.class);

  @Autowired
  private UserRepository userRepository;

  @Autowired
  private PaymentClient paymentClient;


  @Override
  public ApiResponse addUser(UserRequest userRequest, HttpServletRequest httpRequest) {
    LOGGER.info("addUser: userRequest={}", userRequest);

    User user =
        User.builder().firstName(userRequest.getFirstName()).lastName(userRequest.getLastName())
            .email(userRequest.getEmail()).dateOfBirth(userRequest.getDateOfBirth()).build();

    user = userRepository.save(user);
    UserResponse userResponse = UserResponse.builder().id(user.getId())
        .firstName(user.getFirstName()).lastName(user.getLastName()).email(user.getEmail())
        .dateOfBirth(user.getDateOfBirth()).status(user.getStatus()).createdBy(user.getCreatedBy())
        .createdDate(user.getCreatedDate()).modifiedBy(user.getModifiedBy())
        .modifiedDate(user.getModifiedDate()).build();

    // Assuming errorCode is a field in ApiResponse, replace it with the actual field if different
    return ApiResponse.builder().data(userResponse).success(true)
        .message("User added successfully.").build();
  }

  @Override
  public ApiResponse getUserPayments(Long userId, HttpServletRequest httpRequest) {
    LOGGER.info("getUserPayments: userId={}", userId);

    Optional<User> userOpt = userRepository.findById(userId);

    if (!userOpt.isPresent()) {
      return ApiResponse.builder().success(true).message("User not found.").build();
    }

    User user = userOpt.get();

    UserResponse userResponse = UserResponse.builder().id(user.getId())
        .firstName(user.getFirstName()).lastName(user.getLastName()).email(user.getEmail())
        .dateOfBirth(user.getDateOfBirth()).status(user.getStatus()).createdBy(user.getCreatedBy())
        .createdDate(user.getCreatedDate()).modifiedBy(user.getModifiedBy())
        .modifiedDate(user.getModifiedDate()).build();

    // calling payment service to retrieve payments history
    ApiResponse apiResponse = paymentClient.getPayments(userId);
    userResponse.setPayments(apiResponse.getData() != null ? apiResponse.getData() : null);

    return ApiResponse.builder().data(userResponse).success(true).message("Data found.").build();
  }

}
package com.tutorialsbuddy.userservice.client;

import org.springframework.web.bind.annotation.PathVariable;
import org.springframework.web.service.annotation.GetExchange;
import org.springframework.web.service.annotation.HttpExchange;
import com.tutorialsbuddy.userservice.dto.ApiResponse;

@HttpExchange
public interface PaymentClient {

  @GetExchange("/payments/{senderId}")
  ApiResponse getPayments(@PathVariable(name = "senderId") Long senderId);

}
package com.tutorialsbuddy.userservice.client.config;

import org.springframework.beans.factory.annotation.Autowired;
import org.springframework.cloud.client.loadbalancer.reactive.LoadBalancedExchangeFilterFunction;
import org.springframework.context.annotation.Bean;
import org.springframework.context.annotation.Configuration;
import org.springframework.web.reactive.function.client.WebClient;
import org.springframework.web.reactive.function.client.support.WebClientAdapter;
import org.springframework.web.service.invoker.HttpServiceProxyFactory;
import org.springframework.web.util.DefaultUriBuilderFactory;
import com.tutorialsbuddy.userservice.client.PaymentClient;

@Configuration
public class WebClientConfig {

  @Autowired
  private LoadBalancedExchangeFilterFunction filterFunction;

  @Bean
  public WebClient paymentWebClient() {
    String baseUrl = "http://payment-service";
    DefaultUriBuilderFactory factory = new DefaultUriBuilderFactory(baseUrl);
    return WebClient.builder().uriBuilderFactory(factory).filter(filterFunction).build();
  }

  @Bean
  public PaymentClient paymentClient() {
    HttpServiceProxyFactory httpServiceProxyFactory =
        HttpServiceProxyFactory.builderFor(WebClientAdapter.create(paymentWebClient())).build();
    return httpServiceProxyFactory.createClient(PaymentClient.class);
  }

}
package com.tutorialsbuddy.userservice.controller;

import org.springframework.beans.factory.annotation.Autowired;
import org.springframework.web.bind.annotation.GetMapping;
import org.springframework.web.bind.annotation.PathVariable;
import org.springframework.web.bind.annotation.PostMapping;
import org.springframework.web.bind.annotation.RequestBody;
import org.springframework.web.bind.annotation.RequestMapping;
import org.springframework.web.bind.annotation.RestController;
import com.tutorialsbuddy.userservice.dto.ApiResponse;
import com.tutorialsbuddy.userservice.dto.UserRequest;
import com.tutorialsbuddy.userservice.service.UserService;
import jakarta.servlet.http.HttpServletRequest;


@RestController
@RequestMapping(path = "/users")
public class UserController {

  @Autowired
  private UserService userService;

  @PostMapping(path = "/add")
  public ApiResponse addUser(@RequestBody UserRequest userRequest, HttpServletRequest httpRequest) {

    return userService.addUser(userRequest, httpRequest);
  }

  @GetMapping(path = "/{userId}/payments")
  public ApiResponse getUserPayments(@PathVariable(name = "userId") Long userId,
      HttpServletRequest httpRequest) {

    return userService.getUserPayments(userId, httpRequest);
  }

}
Create Payment Service
Create a new Spring Boot project to use it as a microservice that implements business logic and expose REST APIs for payment service.
Using the Spring Initializr (https://start.spring.io), create a new Spring Boot project with the following details:
- Choose the project type (Maven or Gradle).
- Set the language to Java.
- Specify the Spring Boot version (recommended to use the latest stable version, which is selected by default).
- Enter the group name for your project (for example: com.yourdomain).
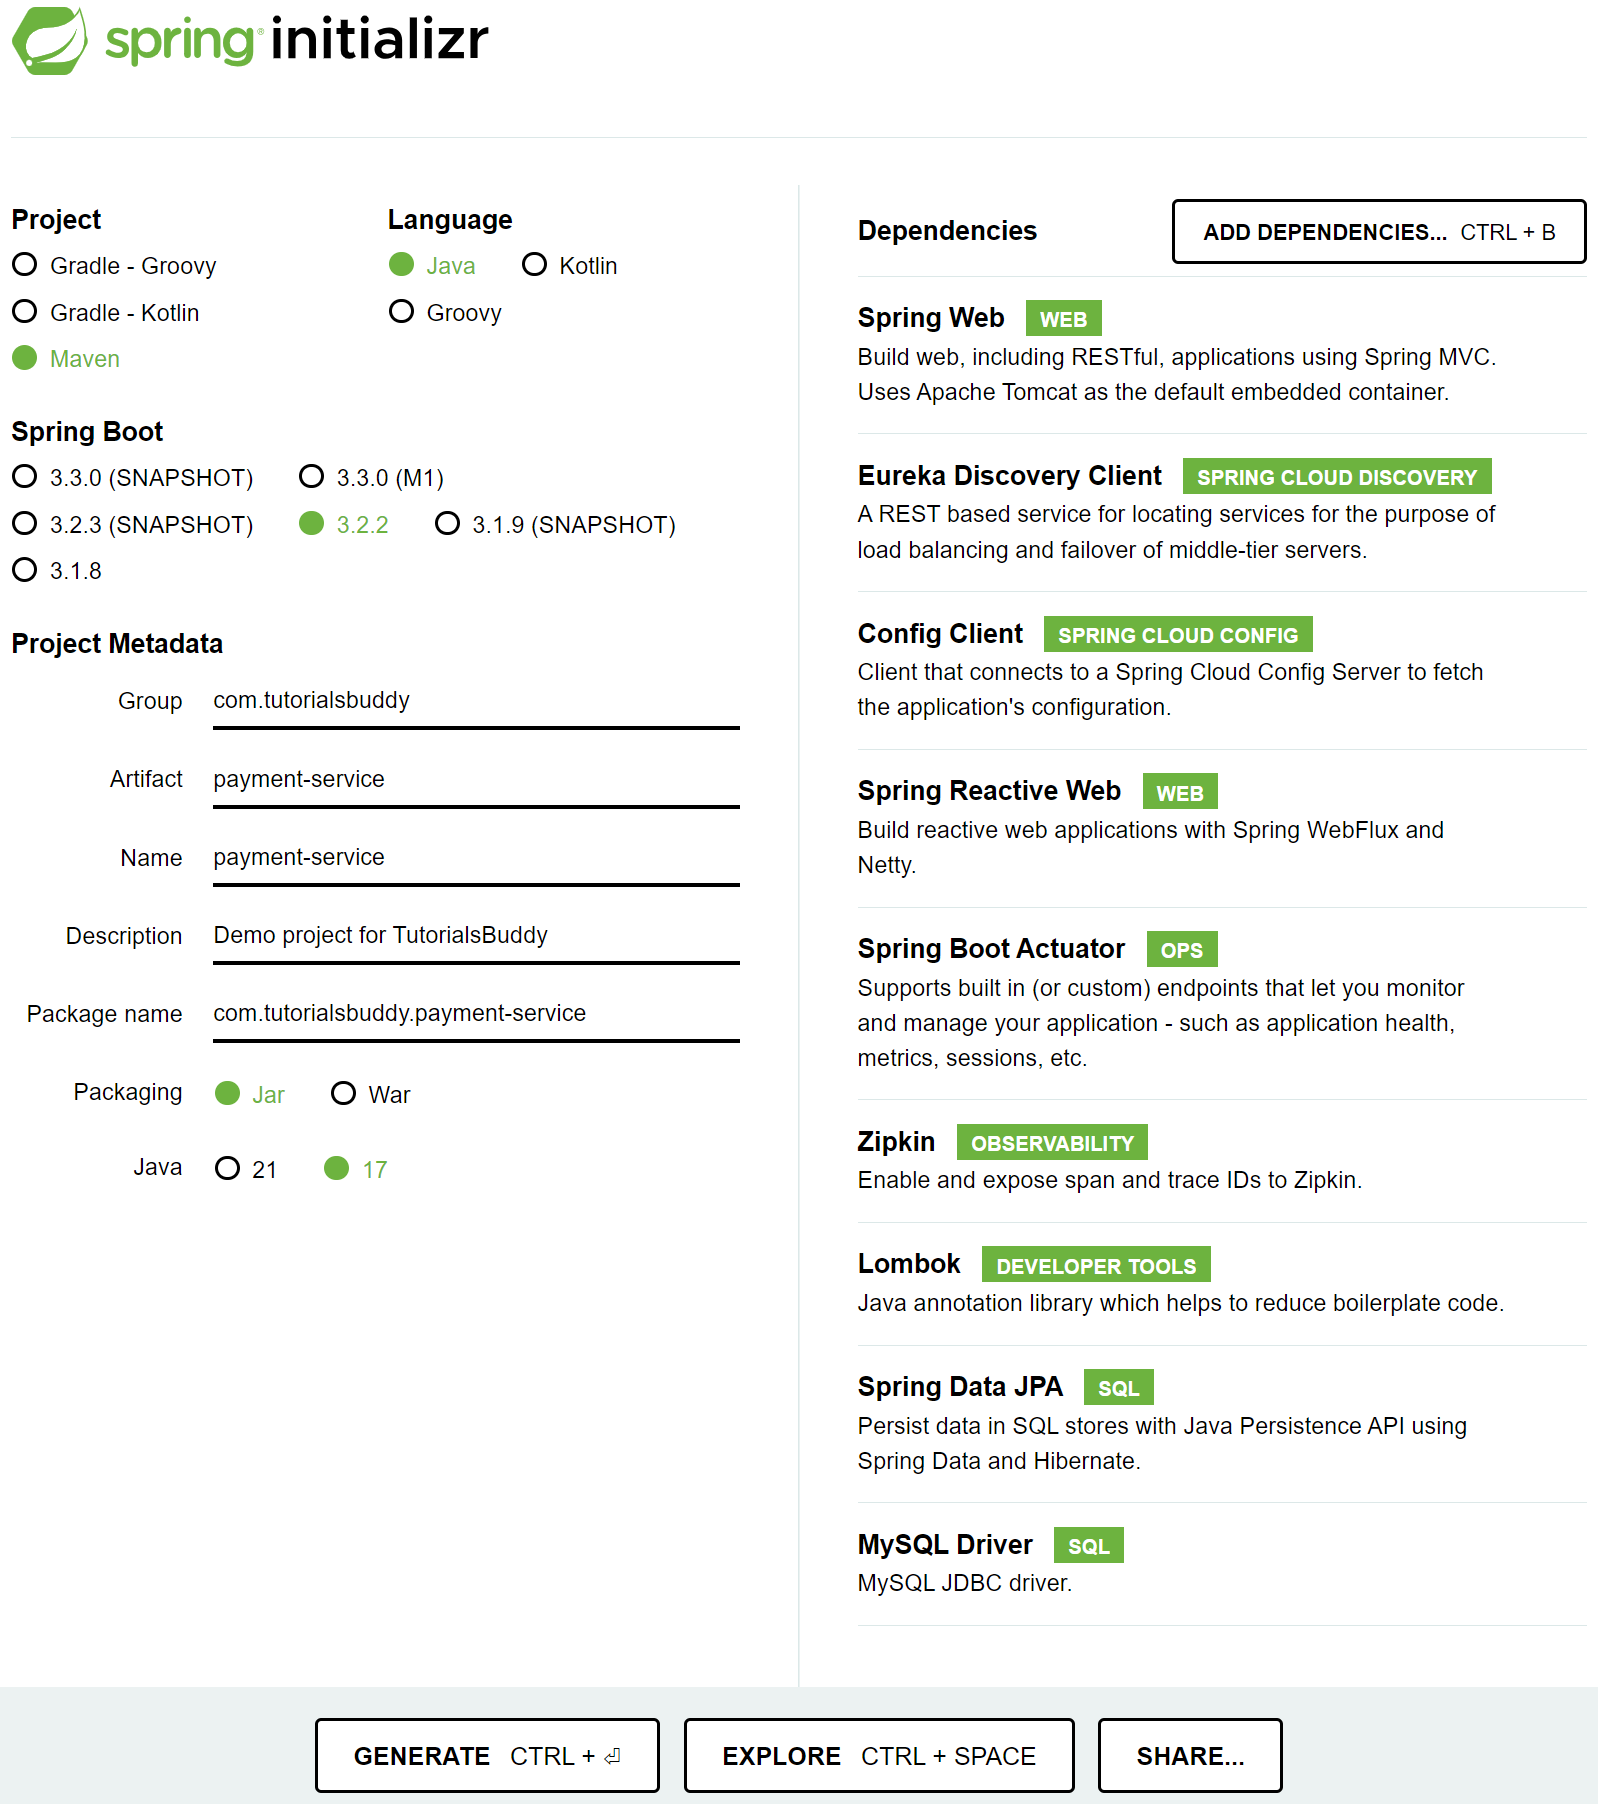
- Enter your project name (user-service) in the Artifact Name field.
- Add any necessary project metadata (description, package name, etc.).
- Set packaging to JAR.
- Select the Java version based on the compatibility requirements of your project.
- Add necessary dependencies, such as Spring Web, Eureka Discovery Client (SPRING CLOUD DISCOVERY), Config Client (SPRING CLOUD CONFIG), Spring Reactive Web, Spring Boot Actuator, and Zipkin as dependencies. This microservice will perform CRUD operations, so let's include Lombok, Spring Data JPA, and the MySQL Driver.
- Click the Generate button to download the Spring Boot project as a zip file.
- Extract the contents of the zip file to a directory on your local machine.
- Import the extracted project as a Maven project into your preferred IDE, such as IntelliJ IDEA, Eclipse, or Spring Tool Suite.
- In your main Spring Boot application class, add the @EnableDiscoveryClient annotation to enable the service discovery capabilities:
- Rename the /resources/application.properties file to /resources/application.yaml, and configure the Eureka Server by specifying properties as shown below:
- Create an entity class to represent the payment table in the database. The entity class is typically annotated with @Entity to indicate that it is a JPA (Java Persistence API) entity.
- Create a repository interface to perform CRUD operations on the payment entity:
- Create DTO classes to represent data for API requests and responses:
- Create PaymentService interface to define the methods for managing payment-related operations:
- Create a PaymentServiceImpl class to provide the concrete implementation for the user-related functionalities specified in the PaymentService interface:
- Create a PaymentController class to handle HTTP requests and manage the interaction with the application services related to payment operations:
Refer to the image below for example:
package com.tutorialsbuddy.paymentservice;

import org.springframework.boot.SpringApplication;
import org.springframework.boot.autoconfigure.SpringBootApplication;
import org.springframework.cloud.client.discovery.EnableDiscoveryClient;
import org.springframework.data.jpa.repository.config.EnableJpaAuditing;

@SpringBootApplication
@EnableDiscoveryClient
@EnableJpaAuditing
public class PaymentServiceApplication {

  public static void main(String[] args) {
    SpringApplication.run(PaymentServiceApplication.class, args);
  }

}
spring:
  application:
    name: payment-service

# Import configurations from the config-server
  config:
    import: optional:configserver:http://localhost:8888
package com.tutorialsbuddy.paymentservice.entity;

import java.util.Date;
import org.springframework.data.annotation.CreatedBy;
import org.springframework.data.annotation.CreatedDate;
import org.springframework.data.annotation.LastModifiedBy;
import org.springframework.data.annotation.LastModifiedDate;
import org.springframework.data.jpa.domain.support.AuditingEntityListener;
import jakarta.persistence.Entity;
import jakarta.persistence.EntityListeners;
import jakarta.persistence.GeneratedValue;
import jakarta.persistence.GenerationType;
import jakarta.persistence.Id;
import jakarta.persistence.Table;
import lombok.AllArgsConstructor;
import lombok.Builder;
import lombok.Builder.Default;
import lombok.Data;
import lombok.NoArgsConstructor;

@Data
@Builder
@AllArgsConstructor
@NoArgsConstructor
@EntityListeners(AuditingEntityListener.class)
@Entity
@Table(name = "payment")
public class Payment {

  @Id
  @GeneratedValue(strategy = GenerationType.IDENTITY)
  private Long id;
  private double amount;
  private double fee;
  private Long senderId;
  private Long receiverId;
  @Default
  private int status = -1;
  @Default
  private boolean success = false;

  @CreatedDate
  private Date createdDate;
  @LastModifiedDate
  private Date modifiedDate;

  @CreatedBy
  private String createdBy;
  @LastModifiedBy
  private String modifiedBy;

}
package com.tutorialsbuddy.paymentservice.repository;

import java.util.List;
import org.springframework.data.repository.CrudRepository;
import org.springframework.stereotype.Repository;
import com.tutorialsbuddy.paymentservice.entity.Payment;

@Repository
public interface PaymentRepository extends CrudRepository<Payment, Long> {

  List<Payment> findBySenderId(Long senderId);

}
package com.tutorialsbuddy.paymentservice.dto;

import lombok.Builder;
import lombok.Data;

@Data
@Builder
public class ApiRequest {

}
package com.tutorialsbuddy.paymentservice.dto;

import lombok.AllArgsConstructor;
import lombok.Builder;
import lombok.Data;
import lombok.NoArgsConstructor;

@Data
@Builder
@AllArgsConstructor
@NoArgsConstructor
public class ApiResponse {
  private boolean success;
  private String message;
  private int errorCode;
  private Object data;

}
package com.tutorialsbuddy.paymentservice.dto;

import lombok.Data;
import lombok.EqualsAndHashCode;
import lombok.ToString;

@Data
@EqualsAndHashCode(callSuper = false)
@ToString
public class PaymentRequest extends ApiRequest {
  private Long id;
  private double amount;
  private double fee;
  private Long senderId;
  private Long receiverId;
}
package com.tutorialsbuddy.paymentservice.dto;

import java.util.Date;
import lombok.Builder;
import lombok.Data;

@Data
@Builder
public class PaymentResponse {
  private Long id;
  private double amount;
  private double fee;
  private Long senderId;
  private Long receiverId;
  private int status;
  private boolean success;
  private Date createdDate;
  private Date modifiedDate;
  private String createdBy;
  private String modifiedBy;

}
package com.tutorialsbuddy.paymentservice.service;

import com.tutorialsbuddy.paymentservice.dto.ApiResponse;
import com.tutorialsbuddy.paymentservice.dto.PaymentRequest;
import jakarta.servlet.http.HttpServletRequest;

public interface PaymentService {

  ApiResponse initiate(PaymentRequest paymentRequest, HttpServletRequest httpRequest);

  ApiResponse findPayments(Long senderId, HttpServletRequest httpRequest);

}
package com.tutorialsbuddy.paymentservice.service.impl;

import java.util.ArrayList;
import java.util.List;
import org.slf4j.Logger;
import org.slf4j.LoggerFactory;
import org.springframework.beans.factory.annotation.Autowired;
import org.springframework.stereotype.Service;
import com.tutorialsbuddy.paymentservice.dto.ApiResponse;
import com.tutorialsbuddy.paymentservice.dto.PaymentRequest;
import com.tutorialsbuddy.paymentservice.dto.PaymentResponse;
import com.tutorialsbuddy.paymentservice.entity.Payment;
import com.tutorialsbuddy.paymentservice.repository.PaymentRepository;
import com.tutorialsbuddy.paymentservice.service.PaymentService;
import jakarta.servlet.http.HttpServletRequest;

@Service
public class PaymentServiceImpl implements PaymentService {
  private static final Logger LOGGER = LoggerFactory.getLogger(PaymentServiceImpl.class);

  @Autowired
  private PaymentRepository paymentRepository;

  @Override
  public ApiResponse initiate(PaymentRequest paymentRequest, HttpServletRequest httpRequest) {
    LOGGER.info("initiate: paymentRequest={}", paymentRequest);

    Payment payment = Payment.builder().amount(paymentRequest.getAmount())
        .fee(paymentRequest.getFee()).senderId(paymentRequest.getSenderId())
        .receiverId(paymentRequest.getReceiverId()).success(true).build();
    payment = paymentRepository.save(payment);

    PaymentResponse paymentResponse = PaymentResponse.builder().id(payment.getId())
        .amount(payment.getAmount()).fee(payment.getFee()).senderId(payment.getSenderId())
        .receiverId(payment.getReceiverId()).createdBy(payment.getCreatedBy())
        .createdDate(payment.getCreatedDate()).modifiedBy(payment.getModifiedBy())
        .modifiedDate(payment.getModifiedDate()).success(payment.isSuccess()).build();

    return ApiResponse.builder().data(paymentResponse).success(true).errorCode(0)
        .message("Payment completed successfully.").build();
  }

  @Override
  public ApiResponse findPayments(Long senderId, HttpServletRequest httpRequest) {
    LOGGER.info("findPayments: senderId={}", senderId);

    List<Payment> payments = paymentRepository.findBySenderId(senderId);

    List<PaymentResponse> paymentResponseList = new ArrayList<PaymentResponse>();
    payments.forEach(payment -> {
      PaymentResponse paymentResponse = PaymentResponse.builder().id(payment.getId())
          .amount(payment.getAmount()).fee(payment.getFee()).senderId(payment.getSenderId())
          .receiverId(payment.getReceiverId()).createdBy(payment.getCreatedBy())
          .createdDate(payment.getCreatedDate()).modifiedBy(payment.getModifiedBy())
          .modifiedDate(payment.getModifiedDate()).build();

      paymentResponseList.add(paymentResponse);
    });

    return ApiResponse.builder().data(paymentResponseList).success(true).errorCode(0)
        .message("Data found.").build();
  }

}
package com.tutorialsbuddy.paymentservice.controller;

import org.springframework.beans.factory.annotation.Autowired;
import org.springframework.web.bind.annotation.GetMapping;
import org.springframework.web.bind.annotation.PathVariable;
import org.springframework.web.bind.annotation.PostMapping;
import org.springframework.web.bind.annotation.RequestBody;
import org.springframework.web.bind.annotation.RequestMapping;
import org.springframework.web.bind.annotation.RestController;
import com.tutorialsbuddy.paymentservice.dto.ApiResponse;
import com.tutorialsbuddy.paymentservice.dto.PaymentRequest;
import com.tutorialsbuddy.paymentservice.service.PaymentService;
import jakarta.servlet.http.HttpServletRequest;

@RestController
@RequestMapping(path = "/payments")
public class PaymentController {

  @Autowired
  private PaymentService paymentService;

  @PostMapping(path = "/initiate")
  public ApiResponse intiate(@RequestBody PaymentRequest paymentRequest,
      HttpServletRequest httpRequest) {

    return paymentService.initiate(paymentRequest, httpRequest);

  }


  @GetMapping(path = "/{senderId}")
  public ApiResponse findPayments(@PathVariable(name = "senderId") Long senderId,
      HttpServletRequest httpRequest) {

    return paymentService.findPayments(senderId, httpRequest);

  }

}
Create API Gateway
Create a new Spring Boot project to use it as an API Gateway. An API Gateway provides a single entry point for clients to interact with various microservices as it routes requests to the appropriate microservice.
Using the Spring Initializr (https://start.spring.io), create a new Spring Boot project with the following details:
- Choose the project type (Maven or Gradle).
- Set the language to Java.
- Specify the Spring Boot version (recommended to use the latest stable version, which is selected by default).
- Enter the group name for your project (for example: com.yourdomain).
- Enter your project name (api-gateway) in the Artifact Name field.
- Add any necessary project metadata (description, package name, etc.).
- Set packaging to JAR.
- Select the Java version based on the compatibility requirements of your project.
- Add necessary dependencies, such as Reactive Gateway (SPRING CLOUD ROUTING), Eureka Discovery Client (SPRING CLOUD DISCOVERY), Config Client (SPRING CLOUD CONFIG), Spring Boot Actuator, and Zipkin.
- Click the Generate button to download the Spring Boot project as a zip file.
- Extract the contents of the zip file to a directory on your local machine.
- Import the extracted project as a Maven or Gradle project into your preferred IDE, depending on the build system you chose in Spring Initializr.
- In your main Spring Boot application class, add the @EnableDiscoveryClient annotation to enable the service discovery capabilities:
- Rename the /resources/application.properties file to /resources/application.yaml, and configure the Eureka Server by specifying properties as shown below:
Refer to the image below for example:

package com.tutorialsbuddy.apigateway;

import org.springframework.boot.SpringApplication;
import org.springframework.boot.autoconfigure.SpringBootApplication;
import org.springframework.cloud.client.discovery.EnableDiscoveryClient;

@SpringBootApplication
@EnableDiscoveryClient
public class ApiGatewayApplication {

  public static void main(String[] args) {
    SpringApplication.run(ApiGatewayApplication.class, args);
  }

}
spring:
  application:
    name: api-gateway
  config:
    import: optional:configserver:http://localhost:8888
Download and Run Zipkin
Zipkin is an open-source distributed tracing system that helps collect log data from microservices-based applications for troubleshooting.
- Download the Zipkin JAR from https://zipkin.io/pages/quickstart.
- Run the Zipkin using this command:
- After the Zipkin server is running, you can access the Zipkin dashboard by visiting to http://localhost:9411/zipkin/ in your web browser. This dashboard provides tools to view logs.
java -jar .\zipkin-server-3.0.5-exec.jar
Replace zipkin-server-3.0.5-exec.jar with the downloaded file name.
Run and Test Microservices
- Run the services in the following sequence: registry-server, config-server, api-gateway, user-service, and payment-gateway. Ensure that config-server is started first, because api-gateway, user-service, and payment-gateway import configurations from the config-server.
- Invoke APIs via the API Gateway.
Here's an example of calling the user-service API to add users through the API Gateway:

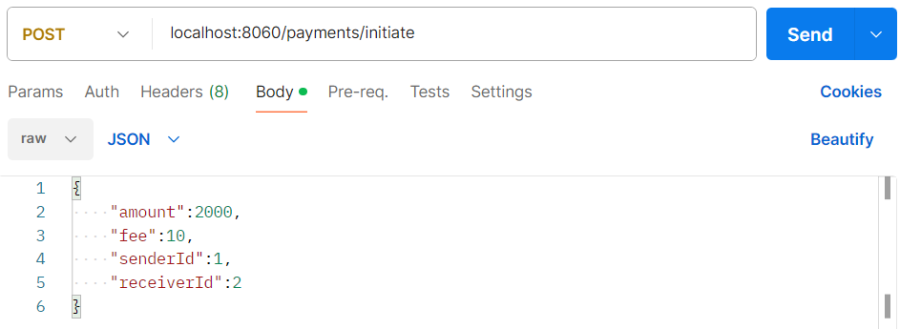
Here's an example of calling the payment-service API to add payment details through the API Gateway:
Here's an example of calling the user-service API to retrieve user data, including payment details, through the API Gateway:

Here's the Github link to this example project.